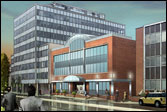
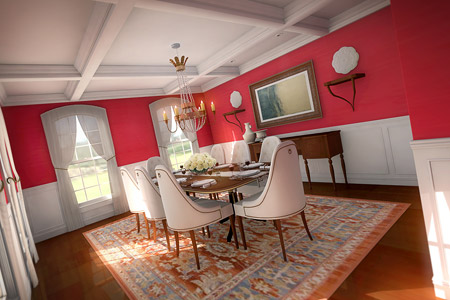
Visualization
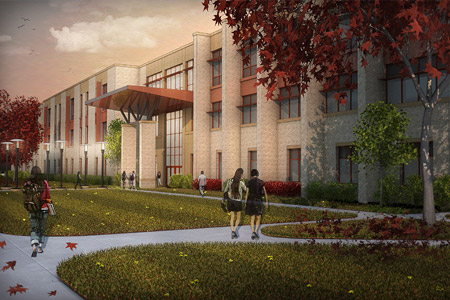
Architectural Illustration
Your ideas. Out loud.
Bring your concepts into focus and delight your clients with our accurate and dynamic architectural illustration service. Combining technical precision with our deft artistic touch, we’ll work with you to create clean, concise illustrations that fire the imagination.
Call us now on (216)359-1003 and discover how to give your architectural presentations a professional impact.
Architectural Illustration Workflow
| Step 01 |
Step 02 |
Step 03 |
Step 04 |
Step 05 |
| Project Information | Rough Block-out | Final Line Drawing | Rendering | Proofs |
| Once we receive all the necessary materials and specifications from you for your project, we’ll get to work, figuring out the compositions that represent your project best. | Using your project plans as a guide, a rough block-out is sketched out and emailed to you for approval. | Upon acceptance of the initial view and composition, the rough block-out is overlaid to produce a final line drawing. | The final line drawing is rendered and entourage added to complete the illustration. | Once your illustration has been refined to presentation quality, we’ll send you a link to your digital proof. When you’re happy with the work, we upload the final art to you, leaving you with an illustration that captures the heart of your concepts. |
 |
 |
 |
 |
 |
Architectural Illustration Specs
Please upload as much information as you have available when getting started on your project.
| Reference Materials | Description | ||
|---|---|---|---|
| On-Angle Photographic or 3D |
Photographic or 3D reference material that is in the exact same angle of view as the final illustration. We accept high resolution photographs, and the following file types: Sketchup models, Vectorworks BIM, CAD 3D, Cinema 4D, and OBJ files with the camera positioned in the exact location for the final composition. | ||
| Blueprints | Electronic blueprint reference: site plan, floor plan, elevations, roof/ceiling plan, and section views. Review the checklist below for blueprint reference materials that are required for interior and exterior architectural illustrations. Package all relevant project materials into a zip file and upload when requesting a quote. | ||
| Interior Specs | Exterior Specs | ||
***Dimensions are required on all project specs.
|
***Dimensions are required on all project specs.
|
||
| Off-Angle Photographic | Reference photos or sketches that were not shot or drawn at the same angle as the final illustration. | ||
STEP 3: Upload Project SpecsPlease zip your project specifications into one file and click “Submit File.” Do not leave the page while your files are uploading. File size limit is 50MB, for larger files please use www.YouSendIt.com and send files to [email protected] with your project name in the subject line.
|
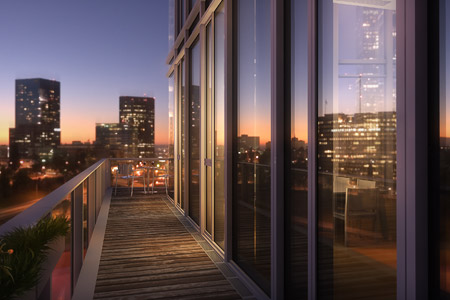
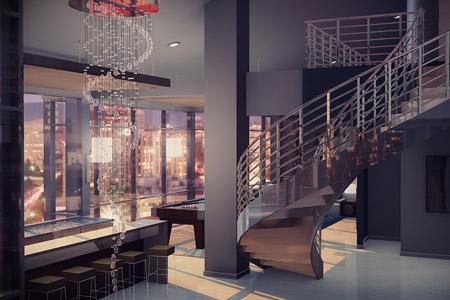
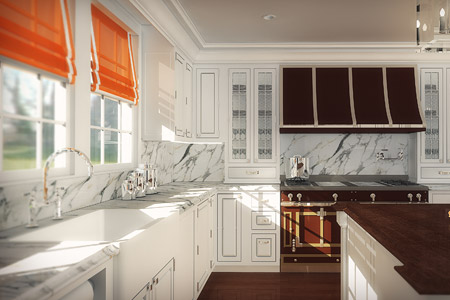

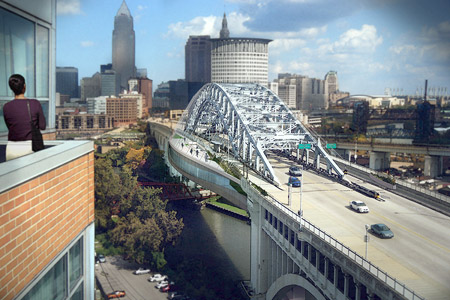
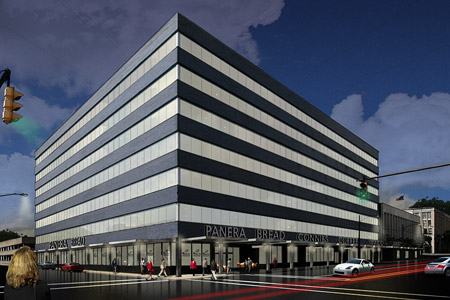
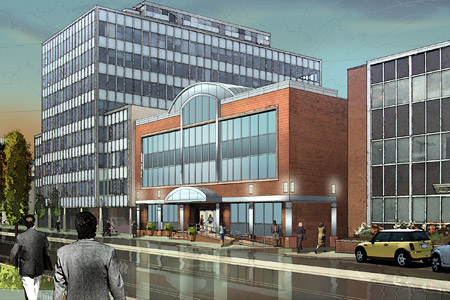
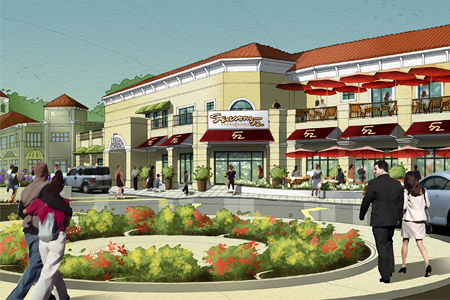
3D Architectural Visualization
Get real.
All those hours, all that work, and now it’s time to show off your designs. With Triplet 3D, your clients will discover how their completed project will look within its surroundings and let you get a vivid look at what you’ve created. We combine your designs with our cutting-edge technology and artistry, giving you customized, high-quality 3D visualizations that truly convey the feeling of experiencing your architecture.
Give your concepts the impact they deserve. Call us today on (216) 359-1003 to find out more.
3D Architectural Visualization Workflow
| Step 01 |
Step 02 |
Step 03 |
Step 04 |
| Project Information | 3D Modeling | Texturing | Lighting |
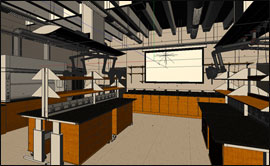
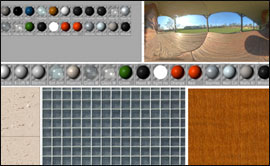
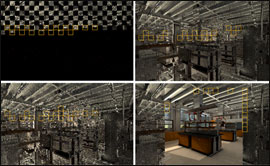
| Once we receive all the necessary materials and specifications from you for your project, we’ll create a custom quote for you. Upon approval, we’ll get to work figuring out the compositions that represent your project best. | The first technical step of the 3D process is modeling the whole geometry of your subject. | Once your architectural geometry has been modeled in 3D space, we begin the texturing process. | Lighting the model is a crucial step in the visualization process. We choose the appropriate type of light for the purpose, test render the lights and adjust them as needed. |
 |
 |
 |
 |
| Step 05 |
Step 06 |
Step 07 |
| Rendering | Post Production | Final Proofs |
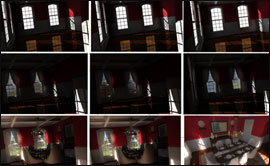
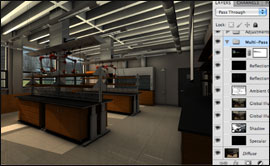
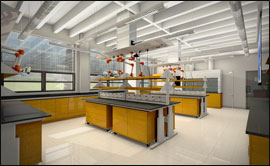
| Rendering is one of the last processes of creating your final images. Rendering could take as little as 15 minutes or 5+ hours for a single still image. The computer calculates all elements in the scene, bouncing light around and computing the characteristics that make up a realistic image; light, shadow, ambient occlusion, reflection, refraction, specularity, and global illumination. | The post-production process is were the image comes alive and really starts to shine. The high resolution rendered image is adjusted for sensory impact and added visual interest. Photoshop adjustment layers are added to boost contrast, increase color saturation, and lighten the image overall. Additional light effects, blurs, and tinting layers are added to bring the image to the final proofing stage. | Once your final visualization has been refined to presentation quality, we’ll send you a link to your digital proof. Once you’re happy with the work, we upload the final artwork to you, leaving you with a visualization that captures the heart of your concepts. |
 |
 |
 |
3D Architectural Visualization Specs
Please upload as much information as you have available when getting started on your project.
| Reference Materials | Description | ||
|---|---|---|---|
| On-Angle Photographic or 3D |
Photographic or 3D reference material that is in the exact same angle of view as the final illustration. We accept high resolution photographs, and the following file types: Sketchup models, Vectorworks BIM, CAD 3D, Cinema 4D, and OBJ files with the camera positioned in the exact location for the final composition. | ||
| Blueprints | Electronic blueprint reference: site plan, floor plan, elevations, roof/ceiling plan, and section views. Review the checklist below for blueprint reference materials that are required for interior and exterior architectural illustrations. Package all relevant project materials into a zip file and upload when requesting a quote. | ||
| Interior Specs | Exterior Specs | ||
***Dimensions are required on all project specs.
|
***Dimensions are required on all project specs.
|
||
| Off-Angle Photographic | Reference photos or sketches that were not shot or drawn at the same angle as the final illustration. | ||
STEP 3: Upload Project SpecsPlease zip your project specifications into one file and click “Submit File.” Do not leave the page while your files are uploading. File size limit is 50MB, for larger files please use www.YouSendIt.com and send files to [email protected] with your project name in the subject line.
|
Contact Info
Payments Accepted

Get Social